

Physicians should wear gloves, and if using a blunt cannula, never touch the tip of the cannula during the injection procedure. In fact, some practitioners run the length of the metal shaft of the cannula over their finger to guide insertion, which can subsequently lead to an increased risk of infection and should be avoided.
Some authors suggest injecting in the Trendelenburg position to reduce vein pressure as well as any possible bleeding5. Some authors also recommend using a topical anaesthetic cream for 45–60 minutes immediately prior to injection6,7.
Second, it is important to identify the area of treatment, for example, by asking a patient to extend and flex their digits8. The target area is usually bound laterally by the fifth metacarpal (MC), medially by the second MC, proximally by the dorsal wrist crease, and distally by the metacarpophalangeal (MCP) joints9 (Figure 1). At the beginning it may be helpful to define and draw the areas of volume loss and locate the ideal site(s) of puncture(s).
The ideal space for filling is the subdermal interfascial lamina — the layer between skin and tendons that is made of two fascias5. However, this interfascial lamina is virtual or partitioned, and fixed to the skin by some interfascia septae, so the only ‘safe’ space for injection is the underface of the dermis.
Anatomy
Before beginning the injection an accurate knowledge of the dorsal hand anatomy is required. The first anatomical study published by Bidic et al10 revealed three distinct fatty laminae separated by thin fascia (three fascial layer system). The large dorsal veins and sensory nerves were shown to be located within the intermediate and the extensor tendons within the deep lamina. No structures traversed the superficial fatty lamina except eight to ten perforating vessels perpendicularly crossing the three laminae. As injuring the vessels or placing the material between the tendons may cause very serious and disfiguring complications, such as compression or in the worst case, compartment syndrome, the dorsal superficial lamina was considered to be the only area safe for volumetric rejuvenation.
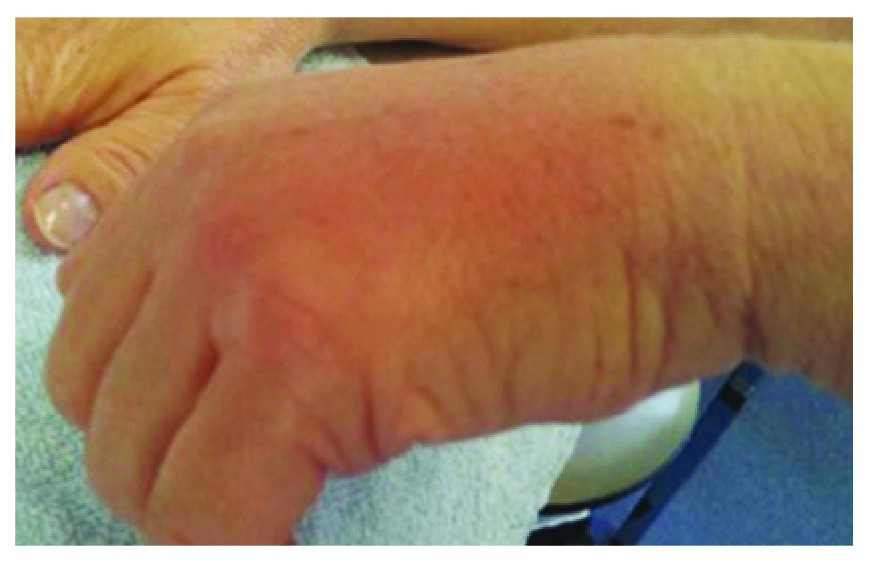
Figure 3: Inflammation and swelling of the left hand after single bolus injection with a sharp needle (right hand blunt cannula)
Further investigations revealed a more complex anatomy of the dorsum of the hand with a 3D-net shaped fascial framework with the dorsal superficial fascia being partly attached to the dermis. Therefore, to avoid running the risk of disrupting the dermal fascia attachments, injuring the vessels, or penetrating into the deeper layers, the optimal and safest layer to deposit the filling material is the underface of the dermis, and the blunt cannula scratching on the bottom of the dermis is the safest tool. It is very important to use a thicker (stiffer and not flexible) cannula (at least 25 G), as a thinner cannula may be too flexible and would almost act as a sharp needle, increasing the risk of injuring the vessels and penetrating into a deeper layer. The tip of the cannula should always be directed slightly to the top with the body of the cannula almost being visible through the skin.
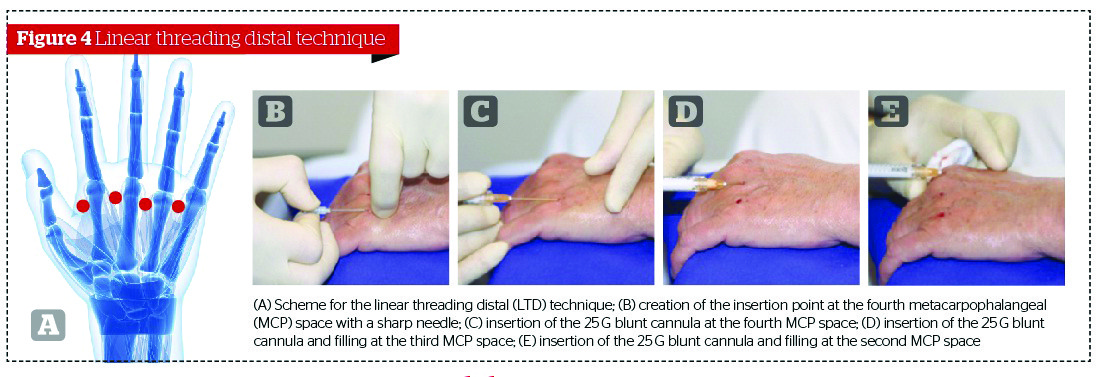
Figure 4: (A) Scheme for the linear threading distal (LTD) technique; (B) creation of the insertion point at the fourth metacarpophalangeal (MCP) space with a sharp needle; (C) insertion of the 25 G blunt cannula at the fourth MCP space; (D) insertion of the 25 G blunt cannula and filling at the third MCP space; (E) insertion of the 25 G blunt cannula and filling at the second MCP space
Injection techniques
Tenting technique
‘Tenting’ is achieved by taking the thumb and forefinger of the non-injecting hand and lifting the skin of the dorsal aspect of the hand being treated. The dorsal aspect is lifted, thereby separating the skin from vascular and tendinous structures9 (Figure 2a).
The filling material is then injected into the tented area below the skin with a syringe parallel to the dorsum of the hand using a sharp needle. This should be injected as a single bolus (0.5–1.5 ml) (Figure 2b) in the areolar plane between the subcutaneous layer and superficial fascia. Care should be taken to avoid injecting into a vein or a tendon9.
Alternatively, the total filler amount can be injected in a number of smaller boluses (0.2–0.5 ml) (Figure 2c), starting slightly medial to the second MC space followed by the next injection at the next MC space until the entire syringe is emptied6. Sometimes it may be useful to save 0.1–0.2 ml for the ulnar compartment if needed, especially if this is a subsequent hand augmentation. This is done only for aesthetic purposes as this area may not be atrophic at the beginning (i.e. at the time of the first session), but may become atrophic over time. Special care should be taken not to inject any material into the so-called ‘snuff box’ — a triangular deepening on the radial aspect of the hand at the level of the carpal bones, specifically the scaphoid and trapezium bones forming the floor — owing to the higher risk of disrupting a vascular supply and causing necrosis.
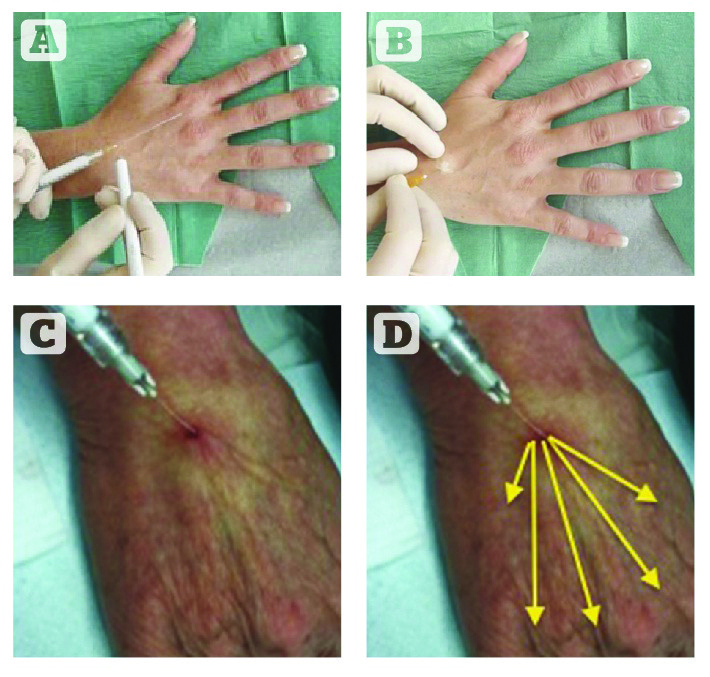
Figure 5: Single proximal insertion point (SPIP) technique; (A) marking of the insertion point; (B) creating entry point with a sharp needle; (C) and (D) insertion of the blunt cannula and filling of a number of metacarpal spaces from a single injection point in a fanning technique
Some physicians use a mixture of dermal filler and anaesthetic agent9. Others firstly create a single bulla with a 2 ml bolus of 1% lidocaine or two to three bullae with approximately 0.5 ml each using a 30 G needle8,12. As the large volume of lidocaine is injected, a bulla (bleb) immediately rises from the hydrodissection of fluid. The filler is now injected directly into the bulla. It is important to position the tip of the needle well into the lidocaine bulla but above the tendons, arteries and veins12.
The bolus is then gently massaged with the fingers in complete flexion (to form a fist) staying distal to the wrist crease, proximal to the MCP joints, and medial and lateral to the sides of the hand5,12. Some authors also advise their patients to sit on the dorsum of their hands for 10 minutes after the implantation of the bolus5,13. The pressure and warmth should flatten out the boluses considerably.