

Many exogenous and endogenous factors, such asexposure to UV rays, smoking or exposure to cigarette smoke, and changes in body mass index (BMI) for example, have an influence on the loss of skin elasticity and reduction in fatty tissue, which is often most noticeable in the face. Over the last few years, dermatologists and aesthetic practitioners have become more aware that facial ageing processes are complex and often happen in a 3-dimensional way, involving all anatomical structures from the individual skin layers to retaining ligaments, the facial fat pads and finally, the bony structures.
Although the ageing process is unique to the individual, we all grow old in a rather similar manner. A typical central European face is usually more pronounced in the mid-face area, and in most cases will normally start to noticeably age during the mid-40s. A reduction in the volume of the facial fat compartments plays a vital role here1, 2, 3. This leads to 3-dimensional sagging as a result of a lack of supporting structures in the medial cheek area (in contrast, for example, to the central parts of the face or the lateral area, which do not sag in the same manner and intensity). Tear grooves form, the previously firm cheeks lose volume, and — in an indirect manner — the nasolabial folds become more pronounced in most cases, while the jaw line loses its shape and definition. These processes continue to develop during the early 50s, until the whole of the mid-face is sagging downwards and in a medial direction2.
3D vectoring
The negative gravitational effect of the ageing face can be understood as the action of negative vectors. As this is a 3-dimensional process, they are referred to as negative 3-dimensional vectors.
A lifting effect is achieved by using a corrective procedure with positive vectors that act in the opposite direction (i.e. laterally and cranially). This reduces the effect of the processes occurring as part of the ageing process and restores the patient’s youthful facial proportions as much as possible4. This procedure is known as the 3D vector technique. The fat pads are restored to their original position by treating the area with dermal fillers, and particularly those with a high volumising capacity. The aim is to return the youthful anterior cheek projection to the patient’s face — depending on his/her genetics and individual ageing process — to the upper medial and lateral cheek area. By achieving this 3-dimensional lifting and re-contouring effect, the most natural results can be achieved.
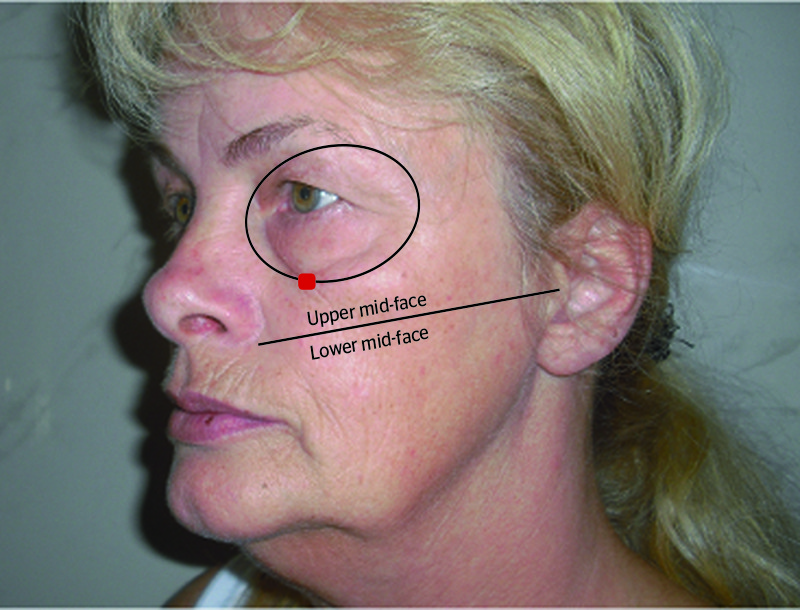
Figure 1 Dividing the mid-face
Particular demands must be made of the materials used for this volume augmentation and lifting procedure. The dermal filler material should be extremely viscous and elastic, such as in the case of the calcium hydroxylapatite-based dermal filler (CaHA; Radiesse®, Merz Aesthetics). This volumising dermal filler has both marketing authorisation from the US Food and Drug Administration (FDA) and European CE certification. Compared with volumising products based on hyaluronic acid formulations, Radiesse stands out because of its high level of viscosity and elasticity compared with most of the usual hyaluronic acid dermal fillers5. The absence of a hygroscopic effect is also a particular advantage. Hyaluronic acid typically has a hygroscopic effect, meaning that it attracts water, which can alter its volume as a result. Therefore, a very precise lifting effect is achieved through the injection of CaHA. The treatment is largely pain-free as CaHA is usually mixed with 2% lidocaine in a 20% ratio.
The 3D vectoring technique with this volume filler is discussed below.
Pre-treatment preparation
In general, it is helpful to define some guidelines for this specific injection technique. First of all, the distinct anatomically defined points from which the augmentation treatment is carried out must be identified.

Before treatment, the treating doctor should determine the aim of treatment with the patient and plan the procedure. To do this, the face is divided into specific areas using reference lines. The most important line for dividing the mid-face into top and bottom halves is the line running from the top end of the nasolabial fold to the tragus (Figure 1 — black line). The volume filler is normally implanted deep (i.e. supraperiosteally) above this line, and below this line it is usually implanted subdermally (with the exception of the chin line). The orbital margin and the infraorbital nerve exit points are identified as no-go areas.
Therefore, certain anatomical structures have to be identified to find the final injection points (entry points) where the different vectors will be carried out (Figures 1–5).